Ball Ejector Testing | Half Scale Pinball
Projects:
Ball trough design
On most pinball machines, a mechanism called the ball trough stores the balls not currently in play. Balls enter the trough through the playfield drain and are returned to play via a mechanism that ejects them back up to the shooter lane. There are several different styles of ball trough but I’ve decided to use the more modern design that requires only a single solenoid (pictured below).
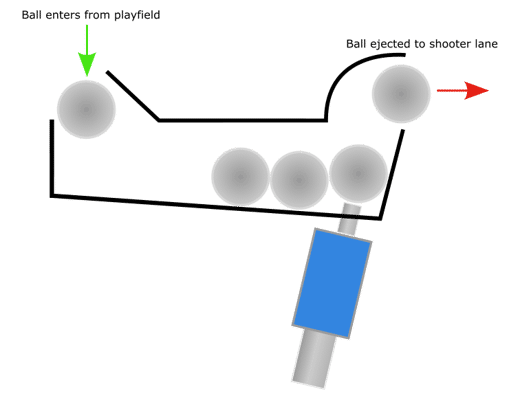
Side-view sketch of how a modern ball trough works. Not pictured are the physical or optical sensors used to detect how many balls are currently stored or if the ejector has jammed.
I like this design for two reasons: it’s dead simple and leaves more space above the playfield under the apron which I plan on using for a special feature I’ll talk about more in a future post. The main drawback to this approach is it takes considerably more space under the playfield due to the solenoid placement and the fact that most push solenoids have plungers that extend fairly far out the back.
Solenoid testing
Given the limited space inside my pinball machine, I wanted to see just how big of a solenoid was required to eject the ball. To test the solenoids, I built a scoop roughly as tall as that needed in the final design and brackets to attach each solenoid to it. I ran each solenoid at an increasingly higher voltage starting at 12v until it was capable of ejecting a 5/8" (~15.87mm) ball with reasonable force.
Guardian Electric A422-064104-04
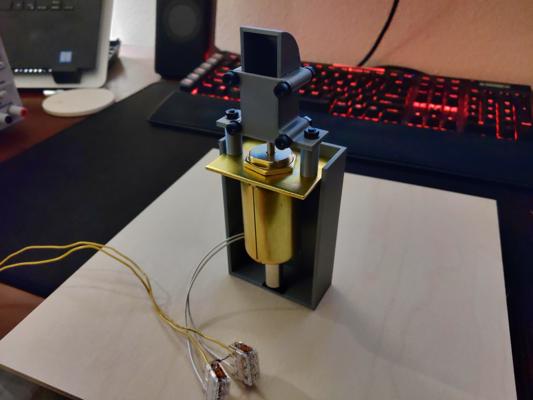
Testing the A422-064104-04 solenoid
The first solenoid I tested was the Guardian Electric A422-064104-04. This thing is a chungus but I picked it because I thought I would need at least a 1" (25mm) stroke length to get the ball up the chute (spoilers: I didn’t). I should also note that up to this point, I had been buying all my solenoids exclusively from Allied Electronics & Automation because they seemed to carry more models than other suppliers. In hindsight, this was a mistake as their stock mostly caters to industrial applications not as constrained by size.
While the solenoid did work, I had to run it at 18v to eject the ball with reasonable force and its size wasn’t even the worst of its problems. It’s expensive, awkward to mount, and heavy. I mean really heavy. I was genuinely concerned mounting it under the playfield without supports would cause the surface to bow. This is what finally pushed me to check other suppliers for smaller models.
Something I’m only just realizing as I type this is I accidentally bought the continuous duty version of this solenoid when I really should have bought the intermittent duty variant (the A422-064104-03). Intermittent duty solenoids are generally stronger than their continuous duty counterparts given the former is allowed time to cool between uses and can therefore pass more current. Ultimately, I don’t believe this would have changed my opinion of this series though given they’re still too large.
McMaster-Carr 70155K112
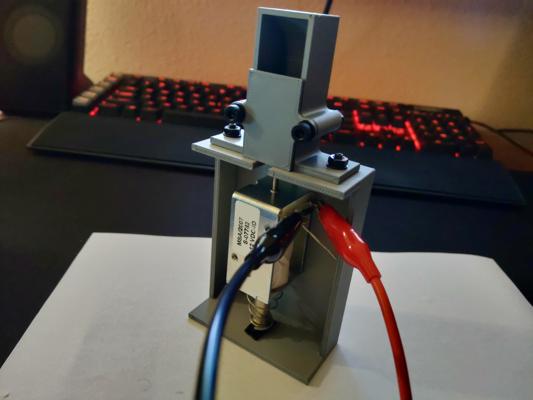
Testing the 70155K112 solenoid
The second solenoid I tested was the McMaster-Carr 70155K112. This model is what I ultimately decided to use in my design and for good reason. At only 12v and with a 1/2" (12.7mm) stroke length, this solenoid was capable of ejecting the ball with no issues. The benefits don’t stop there either. It’s lightweight, short, easy to mount, comes with a return spring, and includes a second plunger type.
This model does cost an eye-watering $40 per unit but I can look the other way given just how perfectly it works in this application.
As an aside, you may have noticed the scoop was redesigned for this test. I intended to reuse the scoop but that didn’t work out in practice as the bolts holding the original together conflicted with this solenoid’s bracket. I could have just removed the lower two bolts but I also wanted test printing the scoop with a flat back as the rounded back of the original didn’t turn out well.
In case you’re wondering, I never throw away unused/broken parts like the old scoop design. I store the unused parts, brims, supports, etc. by filament brand, type, and color in the hopes of one day recycling them with a filament mulcher/extruder.
McMaster-Carr 70155K121
The McMaster-Carr 70155K121 is essentially just the continuous duty variant of the 70155K112 I previously tested. The only reason I decided to test it too was to see if the ball could still be ejected with a lower force solenoid (spoilers: it could not). Most of the smaller solenoids I could find from other suppliers were weaker than this so I decided to stop my testing here.
Next steps
Now that I’ve chosen a solenoid, I can start designing the ball trough assembly. I expect this to take a while given the geometry will be relatively complex compared to my previous assemblies but that’s not to say I won’t be posting in the interim. I’ve got a few other projects on backburner that I’ll be sharing until the ball trough prototype is ready.